Overview
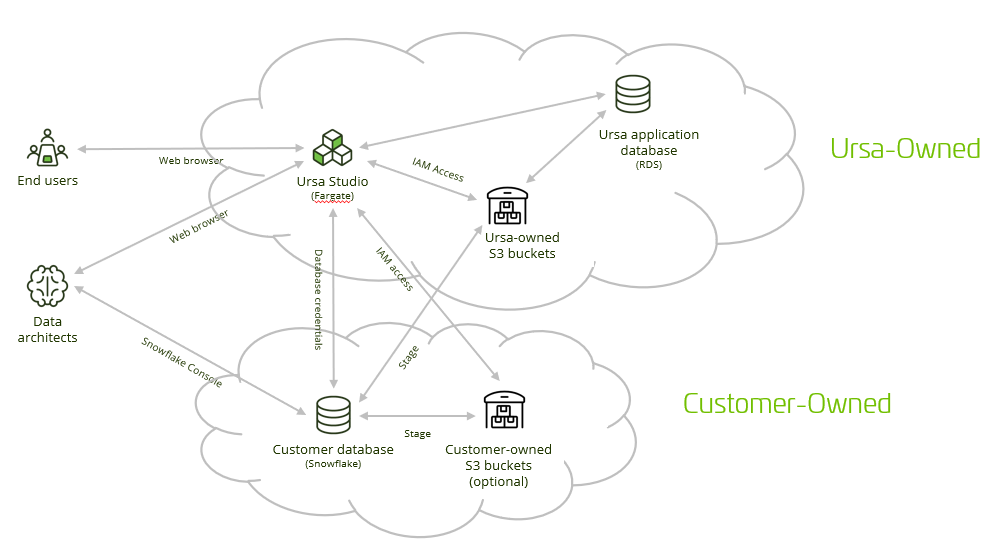
This document will provide a detailed account of the streamlined setup of our AWS Snowflake hybrid cloud deployment. In this configuration, the customer either provisions a new Snowflake database or pulls in Ursa into an existing Snowflake database in their account. Ursa Health provisions the Ursa Studio application and related cloud assets in Ursa's account.
The handshake between the organizations is twofold: the Snowflake "service account" user that will govern Ursa Studio's access to the database, and a stage that must be set up around a "utility" S3 bucket that Ursa will manage.
Snowflake Setup
Whether the customer is creating a new database for the Ursa Health engagement or adding Ursa to an existing database, Ursa's work will typically happen within a new dedicated schema, named ursa. In addition to the schema, the customer should create a warehouse, a role, and a user that inherits from the role. The role should have read-write access to the ursa schema along with read-only access to any existing tables (if any exist) that need to be brought into the Ursa data model.
In order to complete this work, there are four details that you'll need to have received from your engineering contact at Ursa Health. The first is the public key for the service account user, because we prefer to use Snowflake's recommended key pair authentication instead of traditional password authentication. The second is the IP address from which Ursa Studio will be querying Snowflake, for you to set up a network whitelist. The third is the ARN of the IAM role that will govern access to the S3 buckets, which you will use to set up a storage integration. The fourth is the names of the S3 buckets that have been set up for the deployment, also for use in setting up the storage integration.
Much of the following work can be done via the Snowflake console UI, but for simplicity the full command set is reproduced here. Any name starting with my_ should be understood to take any value of that aligns with your conventions.
-- set up the database and warehouse (we recommend to do this as SYSADMIN)
create database my_ursa_db;
use database my_ursa_db;
create schema ursa;
create warehouse my_ursa_wh warehouse_size = 'SMALL' auto_suspend = 300;

-- set up user, role, and network policy (we recommend to do this as ACCOUNTADMIN)
-- capitalization of the string literals is important
create role my_ursa_app_role;
grant usage on warehouse my_ursa_wh to role my_ursa_app_role;
grant usage on database my_ursa_db to role my_ursa_app_role;
grant all on schema my_ursa_db.ursa to role my_ursa_app_role;
create network policy my_ursa_network_policy allowed_ip_list = ('this.value.from.ursa');
create user my_ursa_service_account
  type = service
  default_namespace='MY_URSA_DB'
  default_warehouse='MY_URSA_WH'
  default_role='MY_URSA_APP_ROLE'
  rsa_public_key='MIIB...[this value from Ursa]'
  network_policy=my_ursa_network_policy;
grant role my_ursa_app_role to user my_ursa_service_account;

-- set up storage integration and stage
create storage integration my_ursa_storage_integration
  type = external_stage
  storage_provider = S3
  enabled = true
  storage_aws_role_arn = 'role ARN from Ursa'
  storage_allowed_locations = ('s3://import-bucket-name-from-ursa', 's3://utility-bucket-name-from-ursa');

grant usage on integration my_ursa_storage_integration to role my_ursa_app_role;

-- it's important for the stage name to be exactly the same as the bucket name but capitalized
create stage ursa."UTILITY-BUCKET-NAME-FROM-URSA"
  url = 's3://utility-bucket-name-from-ursa/'
  storage_integration = my_ursa_storage_integration;

grant all privileges on stage ursa."UTILITY-BUCKET-NAME-FROM-URSA"  to role my_ursa_app_role;

-- running
-- list @ursa."UTILITY-BUCKET-NAME-FROM-URSA";
-- right now should fail with a "User is not authorized to perform: sts:AssumeRole on resource" error
-- but this should run without error as soon as Ursa has finished their setup

-- details to communicate back to Ursa
desc integration my_ursa_storage_integration;

-- table access for individual users:
-- you can grant access to this role for any individual
-- Snowflake user account that you want to allow to
-- interrogate Ursa-managed tables.
create role my_ursa_readonly_role;
grant usage on warehouse my_ursa_wh to role my_ursa_readonly_role;
grant usage on database my_ursa_db to role my_ursa_readonly_role;
grant usage on schema my_ursa_db.ursa to role my_ursa_readonly_role;
grant select on all tables in schema my_ursa_db.ursa to role my_ursa_readonly_role;
Communication back to Ursa team
The Ursa engineering team will need some information back to complete their part of the setup.
First, let them know the hostname, user, read-only role name, and database name that you just set up. The hostname can just be the URL that you use to log into the Snowflake console. This will help the Ursa team set up the service account user access. It is not necessary to set up a password or to communicate that password back to the Ursa team. The public key that Ursa sent you earlier will do the work of authentication between Ursa Studio and snowflake.
Then, look at the desc integration command you just ran and report back the value corresponding with STORAGE_AWS_IAM_USER_ARN and STORAGE_AWS_EXTERNAL_ID. This will help the Ursa team set up the bucket/stage authorization.
That should be it! Once the Ursa team finishes their corresponding parts of the handshake your Ursa Studio application should be fully operational.
Optional extras
Adding more buckets
You might have noticed that you set up a storage integration with an allowed location of an import bucket along with the the utility bucket. If it would help keep data import organized, you can set up a stage around the import bucket in the same way that you set one up for the utility bucket. Furthermore, if you'd like to set up import or utility buckets under your AWS account, that can also be arranged. You'll need to grant IAM access to the Ursa Studio ECS task role; the Ursa Health team can walk you through this process.
Single Sign-On
Setting up SSO via Amazon Cognito is covered in our Single Sign-On documentation.