Linking (or joining) a timelines object, which has an interval temporal class, to an encounter object, which has an event temporal class, is a commonly required task in Ursa Studio. The instructions outlined below assume that a timelines object is being linked to an encounter object in an event-denominated measure, like a 30-Day All Cause Readmission measure.
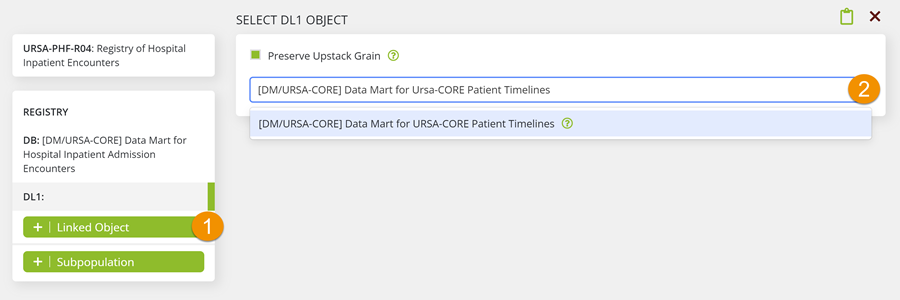
1. Click the “+ Linked Object” button below the encounter object.
2. Choose the the desired timelines object from “Select DL1 Object” dropdown.

When working with encounters objects in the URSA-CORE namespace, you will generally want to link the [DM/URSA-CORE] Data Mart for URSA-CORE Patient Timelines object.
3. In the “Upstack Restrictions” panel, set “Enforce Linked Object Existence” to the Instance(s) of Linked Object to Must Exist option.
4. Ensure the “Preserve Upstack Grain” checkbox is selected.

The Instance(s) of Linked Object to Must Exist option is analogous to an inner join. Please be thoughtful about using this option if the objects being linked share related but independent concepts that could result in the inadvertent exclusion of records. For example, imagine you have a concept for what constitutes a residential episode for substance use disorder (SUD) treatment. Imagine you also have a concept for what constitutes a SUD diagnosis. These concepts are related but independent. When joining a timelines object restricted to SUD members to an episode object for SUD treatment, it would be better to use the Instance(s) of Linked Object to May Exist option, which is analogous to a left join, to ensure that no episodes are inadvertently excluded by the join.
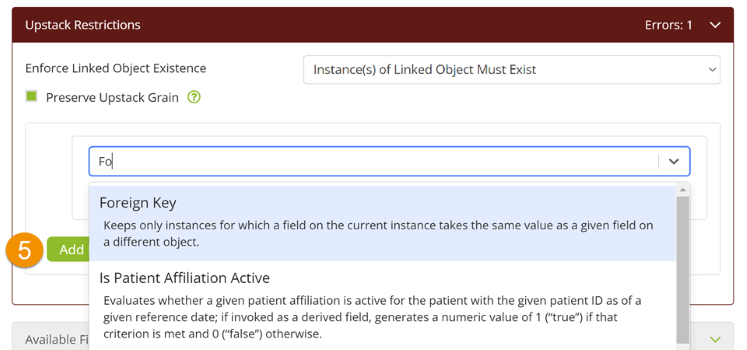
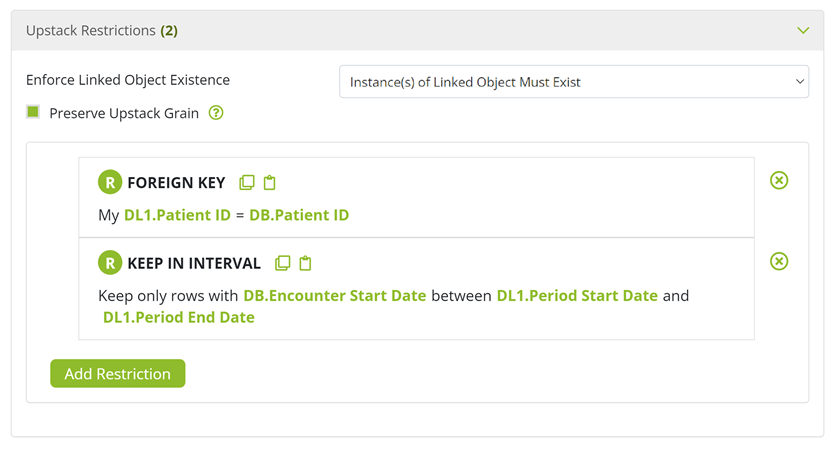
5. Click the “Add Restriction” button and then select the “Foreign Key” pattern. Configure the pattern as follows: My DL1.Patient ID = DB.Patient ID.

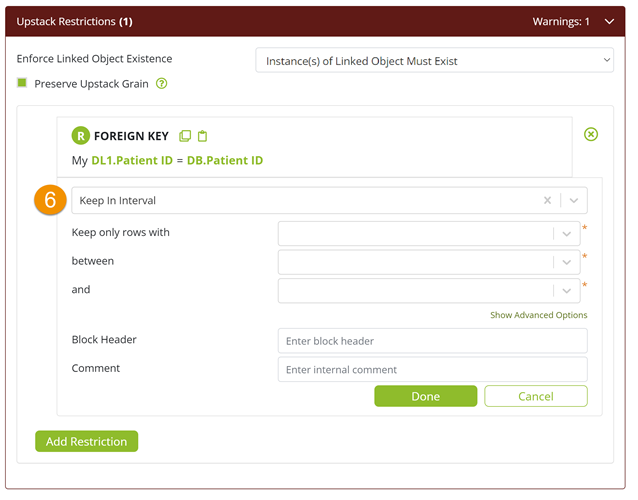
6. Click the “Add Restriction” button again and then select the “Keep In Interval” pattern. Configure the pattern as follows: Keep only rows with DB.Encounter Date between DL1.Period Start Date and DL1.Period End Date.

The previous instruction uses the Encounter Date as the event date that needs to be within the timeline’s interval dates. Here the timelines object is being conformed to an event structure. Be thoughtful about the selection of the event date as it is the date that will be used to specify which of the patient's intervals are joined to the event record. Each interval represents a different state of the patient, and the difference among intervals might be germane for the resulting object or measure. A useful rule of thumb is to use the measure’s “Denominator Case Effective Date” field, found in the measure’s Configuration panel, as the event date. This will ensure the incorporated timeline represents the patient’s state as of the date that is assigned to a reporting period.
